Selecting a viewpoint
When you are selecting a viewpoint, it is important to remember that the picture space that is surrounding your subject is part of your picture. It is interesting to experiment with how much or how little space to include.
 |
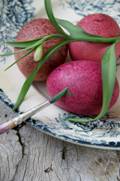 |
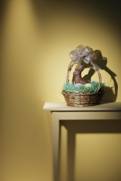
| This photograph shows that you can include a lot of space and still have an interesting composition. The space is full of contrasting shade and light. | This photographer has chosen a very close focus. They have made sure that we can really see the texture on the eggs and the patterns on the wooden table and the plate. |
When you have set up your still life, you will need to use a viewfinder to help you choose the best angle or viewpoint for the arrangement. If you have a camera, use the mechanical viewfinder to frame the arrangement from different angles. If this is not possible, cut a small rectangle out of an A4 piece of paper and select alternative views in the same way. Try distant and close-up viewpoints as well as getting up high and squatting down low. You can record these alternatives by either:
- drawing quick thumbnail sketches of the different viewpoints, or
- taking photographs from different angles with a digital camera.
There are advantages in working with a camera:
- It is a quicker way to record lots of alternatives.
- You can share your different views with your teacher online for advice.
- You can print the chosen one and work from the photograph.
The last point is important because working on a still life will take time. Over time objects may get moved, or you may need them or the surface on which they have been arranged. A photograph will stay still for as long as you can keep it safe.